About this Application

The Site Specific Health and Safety Plan (SSHSP) is a requirement for every spill response regardless of complexity and every "steady state" function that involves people and equipment. The plan is structured to allow for use during a simple event or the most complex. The plan for each spill is built using the following incident information sheet, risk assessment and attachments from the Health, Safety & Loss Control Manual. In the most complex operation the Site Specific Health and Safety Plan could be a document made up of many Site Specific Health and Safety Plans and identified procedures.

To use the application input the event details specifics and incident elements that represent a safety risk or concern in the header form. These details will transfer to the plan section below and populate considerations and instructions in the printed application. Special notes and instructions aside from the pre-programmed outputs can be added to the notes section.

Additional guidance can be displayed by hovering your mouse over a specific area in the input sections. Definitions and instructions can be obtained by clicking on the Help button.

Completion Instructions

The Site Specific Health and Safety Plan (SSHSP) is a requirement for every spill response regardless of complexity and every "steady state" function that involves people and equipment. The plan is structured to allow for use during a simple event or the most complex. The plan for each spill is built using the following incident information sheet, risk assessment and attachments from the Health, Safety & Loss Control Manual. In the most complex operation the Site Specific Health and Safety Plan could be a document made up of many Site Specific Health and Safety Plans and identified procedures.

General Information

General information about the spill and potential exposures including: time and date; product(s) that have been spilled; longitude, latitude and address; atmospheric and oceanic conditions and topography of the shoreline; whether industrial, residential, rural or unpopulated, plus USCG ocean environment e.g. inland, nearshore, open ocean, etc.

Site Specific Information

Specific information about the type of work site: Incident Command Post (ICP); Vessels; Shoreline, Beach; Staging; Camp; Base.

Risk Assessment

A "risk assessment" must be completed for each work site (whether on land or water) prior to the commencement of on scene activities.

The potential hazards at the spill site(s) must be identified, complete with control measures and supporting procedures.

Mitigation Plan

The mitigation plans must be prepared, documented and reviewed with those at risk of encountering hazards.

At a minimum every workforce group must participate in a "Tailgate Safety Meeting" before the start of each shift. Each of the potential risks identified shall be reviewed with the workers at that safety meeting and the "reviewed" column initialed to indicate that a review has taken place. Where high risk critical tasks are identified such as "energy lockout" the mitigation plans will be more elaborate with the requirement for specifically trained employees and supervision, detailed meetings to review procedures, etc.

Plans need to recognize the dynamic nature of spill response and have the flexibility to adapt to potentially changing conditions.

Event Elements and Criteria Inputs

Event Inputs


If no Safety Officer has been designated, use the Operations Section Chief or Duty Officer on site.


Operational working radio frequency. If left undefined frequency will default to VHF Marine band ch. 10.

Select the Zone in which the event is located to identify the closest emergency and medical services.
Incident facility or vessel name.

Select the site information topography by clicking on the check box to the left. Multiple shore types and topographies can be selected.

Hover over the label to display a definition of the topography type.
Site Information
Rocky topography typically contain uneven surfaces with large rock, rocky outcrops and sea weed covered surfaces. Rocks are often sharp and slippery.

Sandy topography typically consists of level or slight grade surfaces. Footing is generally good.

Cobble topography typically consists of smooth rounded stones of varying size with a slight incline to the water line. Footing is generally good, but stones may be weed-covered and slippery.

Marshy topography typically consists a tract of low wetland, often treeless and periodically inundated with water, generally characterized by a growth of grasses, sedges, cattails, and rushes. Ground beneath the water may soft and fluid.

Muskeg topography is generally charactorized as undrained boggy land having sphagnum mosses, sedge and stunted pine and tamarack trees. Footing may prove unstable with ground being soft and unstable.

Cliffs consist of steep high rock face with exposed strata.

Ice and snow covered surfaces.


Multiple products may be selected.Products Released or Present

Check if an air monitoring plan is needed for post site assessment continual monitoring. Triggers could include:
  • Confined space work
  • Site assessment readings at or above action levels
  • Dead air at the clean-up site
Multiple products may be selected.Additional Hazards action levels

Atmospheric
Oceanic
  • Tides

Select the equipment to be used by clicking on the checkbox to the left. The list is intended to cover the high level groupings of equipment included in a typical spill or drill operation.

Hover over the label to display a brief definition of the equipment use parameters.
Operational Assessment - Job Hazard Analysis
Air Ops include helo and fixed wing aircraft other than sUAS events.

Motor vehicles include all equipment requiring a licensed operator capable of transporting personnel and/or equipment.

Vessels include all Classes of vessels as outlined in the S.T.A.R. Manual Section A-II-3

Lifttrucks includes forklifts, manlifts, telehandlers and articulating boom lifts

Cranes include any overhead lifting device

Check if any small unmanned aerial system operation will occur, including both company operated or contracted

Confined space as defined by OSHA under CFR 29 Part 1910.146(b)

Any place where, if precautions were not taken, a person could fall a distance liable to cause personal injury

Check if any potential wildlife encounter could result in worker safety being compromised. Consider possible encounters with, but not limited to, bears, snakes, domestic animals and insects

Check if any potential biohazard encounters could result in worker safety being compromised. Consider possible encounters with, but not limited to, sharps, raw sewage, pathogens, viral or bacterial infection

Select the Tactics to be used by clicking on the checkbox to the left. The list is intended to cover the high level groupings of tasks included in a typical spill or drill operation.

Hover over the label to display a brief definition of the task parameters.
Equipment & Tasks - Job Hazard Analysis
Check if booming operations will require personnel to work from any land based deployment. Also check Booming (off shore) if a vessel will be used to support the shore based booming operation.

Any booming operation using a vessel. This includes but is not limited to diversion, exclusion, encapsulation and protection for both protected and open water operations.

Drum and container handling

Check for all mechanical recovery methods

Includes site work as well as warehouse, vendor and contractor efforts

Consider equipment and personnel when scoping the size and complexity of the zones

Does not include fueling of vessels or equipment

All fueling tasks, including operation off-site

Use if Booming (shore) operations is not used. If both tactics are employed use Booming (shore)

Any tactics or tasks not covered by the list

Site Specific Safety and Health Plan (ICS - 206/208)

*** this is a drill *** this is a drill ***

Incident Name

Date/Time

Operational Period

Emergency Contact

Spilled Product (primary)

Civil Twilight

Other Hazard(s) Action Levels

No other hazards identified

Vessel or Facility Name

On Site Conditions

Wind Speed (knots)

Wave Height (feet)

Wind Direction (from)

Wave Direction

Air Temperature (°F)

Water Temperature (°F)

Visibility (nm)

Current Speed (knots)

Barometer (inHG)

Current Direction

Precipitation

Tides

Site Map

Drop site map photo here or click to upload

Topographical Safety Considerations

No special site considerations.

Rocky Shores

Whenever possible work facing the waves. Keep a lookout for infrequent large waves. Always move slowly on greasy-looking algae or seaweed covered rocks and shores. If a large wave is approaching and cannot be avoided, get a firm foothold. Brace yourself side-on to the wave, leaning slightly into it to retain your balance. Never run from a wave.

Sandy Shores

Whenever possible work facing the waves. Keep a lookout for infrequent large waves. Always move slowly on greasy-looking algae or seaweed covered surfaces. If a large wave is approaching and cannot be avoided, get a firm foothold. Brace yourself side-on to the wave, leaning slightly into it to retain your balance. Never run from a wave. Keep in mind that movement on sandy soils may be slower than on solid ground.

Cobble Beach

Whenever possible work facing the waves. Keep a lookout for infrequent large waves. Always move slowly on greasy-looking algae or seaweed covered shores. If a large wave is approaching, get a firm foothold. Brace yourself side-on to the wave, leaning slightly into it to retain your balance. Never run from a wave.

Marsh

Navigate marshy areas carefully. Identify ingress and egress paths to the worksite that are slightly elevated and firm for walking. If necessary, use shipping pallets, plywood, or tarps to stablize paths and work areas. Walk slowly and test your footing before putting your full weight on your step. Use a walking stick and feel ahead to test the ground firmness. Avoid stepping in areas where the ground feels soggy or where the water is very deep. If you get stuck ask for assistance. Place a log or an object with a large surface area down close to you to provide a bridge to extract yourself.

Muskeg/Tundra

Navigate muskeg and tundra areas carefully. Identify ingress and egress paths to the worksite that are slightly elevated and firm for walking. Walk slowly and test your footing before putting your full weight on your step. Use a walking stick and feel ahead to test the ground firmness. Avoid stepping in areas where the ground feels soggy or where the water is very deep. If you get stuck ask for assistance. Place a log or an object with a large surface area down close to you to provide a bridge to extract yourself.

Cliff

Keep well clear of cliffs and near vertical rock formations. Unstable faces can collapse and slides may occur during cleanup activity. Always wear a hard hat and try to maintain a distance of 8+ meters if possible. Know your tide cycle and be aware of diminishing shoreline as the tide floods. Make sure you have an adequate escape route identified. Fall protection is required when working at heights above two meters.

Ice and Snow Conditions

To prevent slips, trips, and falls, clear walking surfaces of snow and ice, and spread deicer or sand , to the work area when possible. In addition, the following precautions will help reduce the likelihood of injuries:

  • Wear proper footwear when walking on snow or ice is unavoidable, cork boots or boot grips are recommended.
  • Take short steps and walk at a slower pace so you can react quickly to a change in traction.

Other

Auxilary/Augmented Lighting

Hazards

The follow hazards are known or suspected to be on site.

Known Hazards - Identification, Evaluation and Control (Chemical)

Diesel (SDS attached)
Hazards Target Organs Exposure Routes of Entry
Flammable, Skin & Eye Irritant, May be fatal if swallowed or enters airways Not Classified Absorption, Inhalation, Ingestion
Exposure Personal Protective Equipment
Eye / Face Wear appropriate chemical protective glasses or goggles or face shields to prevent skin and eye contact especially caused from splashing.
Skin Wear appropriate personal protective clothing to prevent skin contact. Gloves constructed of nitrile, neoprene or PVC are recommended when handling this material. Chemical protective clothing such as of E.I. DuPont TyChem®, Saranex® or equivalent recommended based on degree of exposure. Note: The resistance of specific material may vary from product to product as well as with degree of exposure.
Respiratory A NIOSH/MSHA-approved air-purifying respirator with organic vapor cartridges or canister may be permissible under certain circumstances where airborne concentrations are or may be expected to exceed exposure limits or for odor or irritation. Protection provided by air-purifying respirators is limited. Refer to OSHA 29 CFR 1910.134, ANSI Z88.2-1992, NIOSH Respirator Decision Logic, and the manufacturer for additional guidance on respiratory protection selection and limitations.
Use a positive pressure, air-supplied respirator if there is a potential for uncontrolled release, exposure levels are not known, in oxygen-deficient atmospheres, or any other circumstance where an air-purifying respirator may not provide adequate protection.
Thermal Product is stored at ambient temperature. No thermal protection is required except for emergency operations involving actual or potential for fire. Use adequate ventilation to keep vapor concentrations of this product below occupational exposure and flammability limits, particularly in confined spaces.
Gasoline (SDS attached)
Hazards Target Organs Exposure Routes of Entry
Highly Flammable, Skin, Eye & Respiratory Irritant, May be fatal if swallowed or enters airways, Causes damage to organs (liver, kidneys, bladder, blood, bone marrow, nervous system) through prolonged or repeated exposure. liver, kidneys, bladder, blood, bone marrow, nervous system Absorption, Inhalation, Ingestion
Exposure Personal Protective Equipment
Eye / Face Wear appropriate chemical protective glasses or goggles or face shields to prevent skin and eye contact especially caused from splashing or spraying.
Skin Wear appropriate personal protective clothing to prevent skin contact. Gloves constructed of nitrile, neoprene or PVC are recommended when handling this material. Chemical protective clothing such as of E.I. DuPont TyChem®, Saranex® or equivalent recommended based on degree of exposure. Note: The resistance of specific material may vary from product to product as well as with degree of exposure.
Respiratory A NIOSH/MSHA-approved air-purifying respirator with organic vapor cartridges or canister may be permissible under certain circumstances where airborne concentrations are or may be expected to exceed exposure limits or for odor or irritation. Protection provided by air-purifying respirators is limited.
Use a positive pressure, air-supplied respirator if there is a potential for uncontrolled release, exposure levels are not known, in oxygen-deficient atmospheres, or any other circumstance where an air-purifying respirator may not provide adequate protection.
Thermal Product is stored at ambient temperature. No thermal protection is required except for emergency operations involving actual or potential for fire. Use adequate ventilation to keep vapor concentrations of this product below occupational exposure and flammability limits, particularly in confined spaces.
Hydraulic Fluid (SDS attached)
Hazards Target Organs Exposure Routes of Entry
No known significant effects or critical hazards. There is no data available. Absorption, Inhalation, Ingestion
Exposure Personal Protective Equipment
Eye / Face Splash goggles and a face shield, where splash hazard exists.
Skin Wear appropriate personal protective clothing to prevent skin contact. Gloves constructed of nitrile, neoprene or PVC are recommended when handling this material. Chemical protective clothing such as of E.I. DuPont TyChem®, Saranex® or equivalent recommended based on degree of exposure. Note: The resistance of specific material may vary from product to product as well as with degree of exposure.
Respiratory If ventilation is inadequate, use a NIOSH-certified respirator with an organic vapor cartridge and P95 particulate filter.
Thermal Product is stored at ambient temperature. No thermal protection is required except for emergency operations involving actual or potential for fire. Toxic fumes gases or vapors may evolve on burning.
IFO/Bunker Oil (SDS attached)
Hazards Target Organs Exposure Routes of Entry
Combustible liquid. May cause cancer from prolonged and repeated skin contact. May damage fertility or the unborn child. May cause damage to liver, kidney and nervous system through prolonged or repeated exposure. Harmful if inhaled. Harmful to aquatic life Skin and eye irritant. May contain and release toxic hydrogen sulfide (H2S) gas. liver, kidneys, nervous system Absorption, Inhalation, Ingestion
Exposure Personal Protective Equipment
Eye / Face Safety glasses or goggles are recommended where there is a possibility of splashing or spraying.
Skin Gloves constructed of nitrile, neoprene, or PVC are recommended.
Chemical protective clothing such as DuPont Tyvek QC, TyChem® or equivalent, recommended based on degree of exposure. The resistance of specific material may vary from product to product as well as with degree of exposure.
Respiratory If hydrogen sulfide concentration may exceed permissible exposure limit, a positive-pressure SCBA or Type C supplied air respirator with escape bottle is required as respiratory protection. If hydrogen sulfide concentration is below H2S permissible exposure limit a NIOSH/ MSHA-approved air-purifying respirator with acid gas cartridges may be acceptable for odor control, but continuous air monitoring for H2S is recommended. Protection provided by air-purifying respirators is limited. Use a NIOSH/ MSHA-approved positive-pressure suppliedair respirator if there is a potential for uncontrolled release, exposure levels are not known, in oxygen-deficient atmospheres, or any other circumstance where an airpurifying respirator may not provide . adequate protection. Refer to OSHA 29 CFR 1910.134, ANSI Z88.2-1992, NIOSH Respirator Decision Logic, and the manufacturer for additional guidance on respiratory protection selection.
Thermal Flammable vapor production at ambient temperature in the open is expected to be minimal, as the material is generally wet. However, depending on oil content and conditions, it is possible flammable vapors could accumulate in the headspace of storage containers, presenting a flammability and explosion hazard. Being heavier than air, vapors may travel long distances to an ignition source and flash back. Runoff to sewer may cause fire or explosion hazard.
Crude Oil-Sweet (SDS attached)
Hazards Target Organs Exposure Routes of Entry
Highly flammable liquid and vapor. May cause genetic defects. May cause cancer. May cause respiratory irritation. May cause drowsiness or dizziness. May cause damage to organs (liver, kidneys, blood, nervous system, and skin) through prolonged or repeated exposure. liver, kidneys, blood, nervous system and skin (repeated exposure). Not reported to have any specific target organ general toxicity single exposure effects. Absorption, Inhalation, Ingestion
Exposure Personal Protective Equipment
Eye / Face Safety glasses or goggles are recommended where there is a possibility of splashing or spraying.
Skin Gloves constructed of nitrile or neoprene are recommended.
Chemical protective clothing such as of E.I. DuPont TyChem®, Saranex® or equivalent recommended based on degree of exposure. Note: The resistance of specific material may vary from product to product as well as with degree of exposure. Consult manufacturer specifications for further information.
Respiratory A NIOSH/ MSHA-approved air-purifying respirator with organic vapor cartridges or canister may be permissible under certain circumstances where airborne concentrations are or may be expected to exceed exposure limits or for odor or irritation. Protection provided by air-purifying respirators is limited.
Use a positive pressure, air-supplied respirator if there is a potential for uncontrolled release, exposure levels are not known, in oxygen-deficient atmospheres, or any other circumstance where an air-purifying respirator may not provide adequate protection.
Thermal Avoid high temperatures, open flames, sparks, welding, smoking and other ignition sources.
Crude Oil-Sour (SDS attached)
Hazards Target Organs Exposure Routes or Entry
Crude oil (sour) is extremely flammable and can cause eye, skin, gastrointestinal, and respiratory irritation. Inhalation may cause dizziness, nausea, or headache. More serious health effects can occur if crude oil is inhaled or swallowed. Crude oil (sour) may contain variable amounts of benzene and N-Hexane. Long-term exposure to these materials has been shown to lead to systemic toxicity such leukemia and peripheral neurotoxicity. Lungs, bone marrow, liver thymus Absorption, Inhalation, Ingestion
Exposure Personal Protective Equipment
Eye / Face Use safety glasses, chemical splash goggles, or a face shield as appropriate to prevent eye contact.
Skin Wear chemical resistant gloves and other protective clothing, as required, to minimize skin contact.
Respiratory Use NIOSH approved respiratory protection, as required, to prevent overexposure to oil mist and vapor. Do not enter storage compartments or hydrogen sulfide areas unless equipped with a NIOSH approved self-contained breathing apparatus (SCBA) with a full face-piece and operated in a positive pressure mode.
Thermal Maintain air concentrations below flammable limits and occupational exposure standards for chemical components by using ventilation and other engineering controls.
Lube Oil (SDS attached)
Hazards Target Organs Exposure Routes of Entry
Causes serious eye irritation Not classified. Absorption, Inhalation, Ingestion
Exposure Personal Protective Equipment
Eye / Face Use goggles or face-shield if the potential for splashing exists.
Skin Wear neoprene, nitrile or PVA gloves to prevent skin contact. Glove suitability is based on workplace conditions and usage. Contact the glove manufacturer for specific advice on glove selection and breakthrough times. Wear appropriate protective clothing.
Respiratory Use a NIOSH approved organic vapor chemical cartridge or supplied air respirators when there is the potential for airborne exposures to exceed permissible exposure limits or if excessive vapors are generated. Observe respirator assigned protection factors (APFs) criteria cited in federal OSHA 29 CFR 1910.134. Self-contained breathing apparatus should be used for fire fighting.
Thermal The product is not combustible per the OSHA Hazard Communication Standard, but will ignite and burn at temperatures exceeding the flash point.
Benzene (SDS attached)
OSHA PEL
TWA STEL Ceiling
1 ppm 5 ppm 25 ppm
NIOSH REL
TWA STEL Ceiling
0.1 ppm 1 ppm N/A
ACGIH TLV
TWA STEL Ceiling LEL
0.5 ppm 2.5 ppm 500 ppm 1.2%
Level D Level C (full face) Level B Manditory Evacuation
<0.5 ppm 1/2 PEL .05 - 10 ppm (half face) >10 - 49 ppm (full face) =>50 - 999 ppm =>1,000 ppm
Hydrogen Sulfide (SDS attached)
OSHA PEL
TWA STEL Ceiling
10 ppm N/A 20 ppm (50 ppm for 10 min.)
NIOSH REL
TWA STEL Ceiling
N/A N/A 10 ppm for 10 min.
ACGIH TLV
TWA STEL Ceiling LEL
1 ppm 5 ppm 100 ppm 4.0%
Level D Level C (full face) Level B Manditory Evacuation
<5 ppm 1/2 PEL 5 - 20 ppm 21 - 49 ppm =>50 ppm
Ammonia (SDS attached)
OSHA PEL
TWA STEL Ceiling
50 ppm (8 hr) 35 ppm 27 mg/m3 (15 min.)
NIOSH REL
TWA STEL Ceiling
25 ppm (10 hr) 35 ppm (15 min) N/A
ACGIH TLV
TWA STEL Ceiling LEL
25 ppm 35 ppm N/A 16.0%
Level D Level C (half face) Level B (full face) Manditory Evacuation
<25 ppm 1/2 PEL 25 - 50 ppm =>50 ppm 10.0% LEL
Carbon Monoxide (SDS attached)
OSHA PEL
TWA STEL Ceiling
50 ppm N/A N/A
NIOSH REL
TWA STEL Ceiling
35 ppm N/A 200 ppm
ACGIH TLV
TWA STEL Ceiling LEL
25 ppm N/A 1200 ppm 12.5%
Level D Level C (full face) Level B Manditory Evacuation
<25 ppm 1/2 PEL 25 - 49 ppm =>50 ppm =>1,200 ppm
VOC/Petroleum Hydrocarbons (SDS attached)
OSHA PEL
TWA STEL Ceiling
N/A N/A N/A
NIOSH REL
TWA STEL Ceiling
N/A N/A N/A
ACGIH TLV
TWA STEL Ceiling LEL
11 ppm (diesel only) N/A N/A N/A
Level D Level C (full face) Level B Manditory Evacuation
<50 ppm 1/2 PEL 50 - 99 ppm 100 - 499 ppm =>500 ppm

Propane/LPG

Propane is highly flammable and explosive. Propane vapors are heavier than air and will accumulate in low lying areas. If propane odor is encountered perform the following steps:

  • Evacuate the area immediately
  • Ensure all ignition sources are extinguished. Turn off powered equipment.
  • Shut off the gas supply if it can be done safely
  • Ventilate using intrinsically safe blowers or fans
  • Call the fire department

Consultants

If it is determined that an Industrial Hygienist is needed, one of the consultants listed below will be contacted and requested to make arrangements through the Logistics Section to travel to the spill site.

(1) Mr. Steven Magasis M..S., C.I.H. (2) Mr. Martin Finkel
Golder Associates, Inc.
4104 - 148th Ave. NE 200 W. 34th Ave., Suite 908
Redmond, Washington 98052 Anchorage, Alaska 99503
Office - (206) 883-0777 ext. 2259 Office - (970) 248-1024
Alt Office (206) 784-9980
Emergency Pager (206) 986-0734
Fax - (907) 248-1024

Other Considerations and Guidance

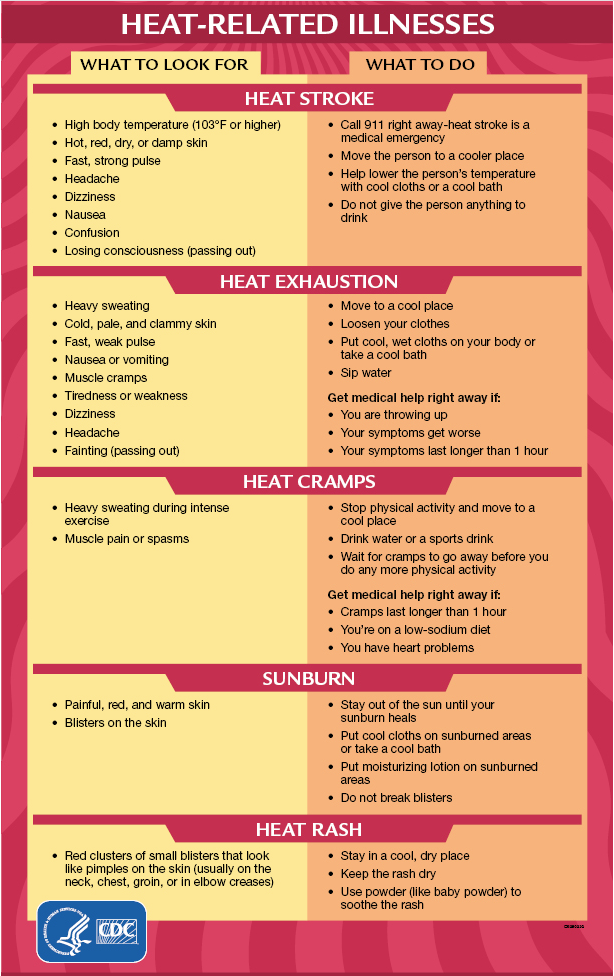
Heat Related Illnesses

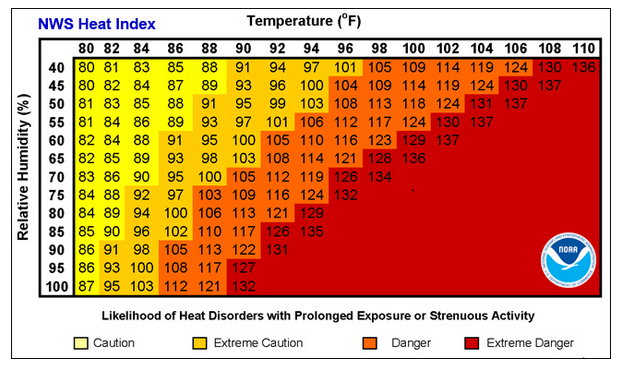
The temperature forecast is above the threshhold where heat related considerations could become a safety concern. Use the chart and table below to for recommendations on risk, work/rest scheduling, hydration and mitigation.

NOAA Heat Index Chart
Heat Risk Catagory Light Work Moderate Work Heavy Work
Work/Rest Water Intake (qrt/hr) Work/Rest> Water Intake (qrt/hr) Work/Rest Water Intake (qrt/hr)
Moderate <90°F continuous 3/4 40/20 min 3/4 30/30 min 1
Mod-2 91°F to 103°F continuous 3/4 40/20 min 3/4 30/30 min 1
High >103°F 20/40 min 3/4 10/50 min 3/4 avoid 1

Signs, symptoms and recommendations of heat related illness

Heat related illness signs and symptoms

Cold Related Illness

The temperature forecast is below the threshhold where cold stress could become a safety concern. Use the chart and table below for recommendations on risk, work/rest scheduling, hydration and mitigation.

Hypothermia

When exposed to cold temperatures, your body begins to lose heat faster than it can be produced. Prolonged exposure to cold will eventually use up your body’s stored energy. The result is hypothermia, or abnormally low body temperature. A body temperature that is too low affects the brain, making the victim unable to think clearly or move well. This makes hypothermia particularly dangerous because a person may not know it is happening and will not be able to do anything about it.

Symptoms

Symptoms of hypothermia can vary depending on how long you have been exposed to the cold temperatures.

Early Symptoms

  • Shivering
  • Fatigue
  • Loss of coordination
  • Confusion and disorientation

Late Symptoms

  • No shivering
  • Blue skin
  • Dialated pupils
  • Slowed pulse and breathing
  • Loss of consciousness

First Aid

Take the following steps to treat a worker with hypothermia:

  • Alert your supervisor and request medical assistance.
  • Move the victim into a warm room or shelter.
  • Remove their wet clothing.
  • Warm the center of their body first-chest, neck, head, and groin-using an electric blanket, if available; or use skin-to-skin contact under loose, dry layers of blankets, clothing, towels, or sheets.
  • Warm beverages may help increase the body temperature, but do not give alcoholic beverages. Do not try to give beverages to an unconscious person.
  • After their body temperature has increased, keep the victim dry and wrapped in a warm blanket, including the head and neck.
  • If victim has no pulse, begin cardiopulmonary resuscitation (CPR).

Frostbite

Frostbite is an injury to the body that is caused by freezing. Frostbite causes a loss of feeling and color in the affected areas. It most often affects the nose, ears, cheeks, chin, fingers, or toes. Frostbite can permanently damage body tissues, and severe cases can lead to amputation. In extremely cold temperatures, the risk of frostbite is increased in workers with reduced blood circulation and among workers who are not dressed properly.

Symptoms

Symptoms of frostbite include:

  • Reduced blood flow to hands and feet (fingers or toes can freeze)
  • Numbness
  • Tingling or stinging
  • Aching
  • Bluish or pail, waxy skin

First Aid

Workers suffering from frostbite should:

  • Get into a warm room as soon as possible.
  • Unless absolutely necessary, do not walk on frostbitten feet or toes-this increases the damage.
  • Immerse the affected area in warm-not hot-water (the temperature should be comfortable to the touch for unaffected parts of the body).
  • Warm the affected area using body heat; for example, the heat of an armpit can be used to warm frostbitten fingers.
  • Do not rub or massage the frostbitten area; doing so may cause more damage.
  • Do not use a heating pad, heat lamp, or the heat of a stove, fireplace, or radiator for warming. Affected areas are numb and can be easily burned.

Trench Foot

Trench foot, also known as immersion foot, is an injury of the feet resulting from prolonged exposure to wet and cold conditions. Trench foot can occur at temperatures as high as 60 degrees F if the feet are constantly wet. Injury occurs because wet feet lose heat 25-times faster than dry feet. Therefore, to prevent heat loss, the body constricts blood vessels to shut down circulation in the feet. Skin tissue begins to die because of lack of oxygen and nutrients and due to the buildup of toxic products.

Symptoms

Symptoms of trench foot include:

  • Reddening of the skin
  • Numbness
  • Leg cramps
  • Swelling
  • Tingling pain
  • Blisters or ulcers
  • Bleeding under the skin
  • Gangrene (the foot may turn dark purple, blue, or gray)

First Aid

Workers suffering from trench foot should:

  • Remove shoes/boots and wet socks.
  • Dry their feet.
  • Avoid walking on feet, as this may cause tissue damage.

Chilblains

Chilblains are caused by the repeated exposure of skin to temperatures just above freezing to as high as 60 degrees F. The cold exposure causes damage to the capillary beds (groups of small blood vessels) in the skin. This damage is permanent and the redness and itching will return with additional exposure. The redness and itching typically occurs on cheeks, ears, fingers, and toes.

Symptoms

Symptoms of chilblains include:

  • Redness
  • Itching
  • Possible blistering
  • Inflammation
  • Possible ulceration in severe cases

First Aid

Workers suffering from chilblains should:

  • Avoid scratching
  • Slowly warm the skin
  • Use corticosteroid creams to relieve itching and swelling
  • Keep blisters and ulcers clean and covered
General Signs and Symptoms of Toxic Exposure

  • Unusual fatigue or sleeping dificulties
  • Unusual irritability
  • Skin Rash, allergies or sores
  • Hearing loss
  • Vision loss or problems
  • Changes in sense of smell
  • Shortness of breath, asthma, cough, wheeze, excessive sputum
  • Chest pain
  • Sudden weight loss or change in appetite
  • Nausea, vomiting, dizzinesss
  • Muscle weakness, tremors
  • Headache
  • Stomach pain
  • Personality change

If any of these symptoms are observed, immediately remove individual from site activity and seek medical attention. A STOP WORK order may be issued at the Safety Officer or Operations Section Chief's discretion.

A work site evaluation should be conducted to ascertain the cause of symptoms and approapriate engineering controls, PPE or work practices implemented.

Bio Hazards

Site hazard awareness - General considerations

Bio-hazards can exist in many forms. If discovered, flag potential sites, provide GPS information to your supervisor to advise appropriate authorities. Advise SOFR to update safety documentation. Site workers should be conscious of and the possible presence of:

  • Raw sewage
  • Sharps (needles and injection intruments)
  • Viral or bacterial agents
While not exclusive, these are the most common bio-hazards encountered on a spill cleanup

Sewage

Sewage holding tanks on vessels may be breached during a collision or grounding, spill in raw sewage into holding areas and work spaces. Suspected sewage contamination should be reported to your supervisor immediately upon discovery and clean up activities stopped and the area evacuated immediately. Bio-hazard sewage cleanup should be performed by a highly-trained, certified professional in order to ensure the safety of the affected area.

Workers exposed to raw sewage can contact any of the following diseases: E. coli, Salmonella, Giardiasis, Tapeworm, Human Papilloma Virus (HPV), Norwalk Virus, HIV/AIDS and other pathogens.

Sharps

Discarded hypodermic needles (shaprs) are becoming common at spill sites in populated settings. If hypodermic needles, drug paraphernalia or makeshift drug labs, blood, human waste, animal waste, sharp objects (visible or unseen), unpleasant odors, bloodborne pathogens, or unknown chemical hazards are encountered at a cleanup site, stop work and contact your supervior until a trained cleanup team can survey and clear the site for work to continue.

Qualified individuals should use hands-off recovery with tongs to collect sharps and dispose of them in appropriate sharps containers. Use appropriate PPE (double gloves, chemical suits, and respirators as required), set up bio-hazard decontamination or provide additional decon equipment to field teams. Waste generated after biohazard contact should be segregated and clearly labeled.

SARS, COVID, avian or other influenza

Workers feeling ill or exhibiting symptoms should notify their supervisor and not report to work to curb potential spread on any communicable illness. Symptoms include:

  • Fever or feeling feverish/having chills
  • Cough
  • Shortness of breath or difficulty breathing
  • Fatigue (tiredness)
  • Sore throat
  • Runny or stuffy nose
  • Muscle pain or body aches
  • Headache
  • Vomiting
  • Diarrhea
  • Change in or loss of taste or smell, although this is more frequent with COVID-19.

Reduce the potential spread of viral or bacterial infections by washing hands and sanitizing common contact surfaces frequently. Isolate individuals displaying any of the above signs or symptoms. Previously ill individuals may return to work after two (2) negative COVID test results (tested 12 hours apart), who display no symptoms of illness for 48 hours.

Booming (containment, diversion, exclusion, towing, anchoring)

General booming operations safety considerations

Be mindful of the following factors during boom deployment and retrieval:

  • Boom and anchors are heavy. Employ proper lifting techniques when deploying and retrieving boom.
  • Bend at the knees and not the waist. Use the buddy system for any item over 60 lbs.
  • Stay out of the bight of the line and don't put yourself between deploying boom/anchor lines and unmovable objects.
  • When connecting boom sections from a small work vessel, ensure the vessel remains balanced.
  • Keep lines as low to the water surface as possible when towing.
  • Use a crane or davit to retrieve anchors whenever possible.
  • Be mindful of lines under strain and the possible trajectory should they part.
  • Pay special attention to end connectors, shackles and ballast chains as boom is being deployed and retrieved. These items can snag on equipment and clothing.
  • Use only approved tow bridles and lines rated for the tow weight of the boom or anchors being used.
  • Limit towed boom length to 500 ft. and tow speed to less than 7 kts.

Always defer to your training and the companies SOP for specific boom types and applications

Drum Handling

  • Drums shall be inspected and given a unique identification prior to being moved;
  • Movement of drums must be kept to a minimum;
  • To the greatest extent possible, drums shall not be moved by unaided manual methods;
  • Prior to shipment, each drum must be in good condition (or overpacked) and properly labeled in accordance with 49 CFR requirements;
  • A log shall be maintained to keep track of sampling, repacking/overpacking, bulking/consolidation, on-site movement, off-site shipment, and any other significant events related to each individual drum;
  • Bulking or product consolidation is allowed only after individual product contents have been characterized;
  • Metal detectors, ground penetrating devices/systems, or other detection methods shall be used to determine the location of buried drums before excavation at sites;
  • Opening and sampling drums

  • If airlines are used, they must be protected to prevent physical damage or contamination;
  • When opening drums, the minimum number of employees shall be allowed in the work area;
  • To the extent possible drums shall be opened remotely or with a suitable shield for personnel. In particular drums showing signs of being pressurized (high pressure or vacuum), containing flammables, or explosive materials must be opened with appropriate remote opening equipment and shields;
  • When opening potentially flammable product drums spark proof tools shall be used. Fire suppression equipment must be located nearby in a shielded/protected location ready for use;
  • A specific work plan shall be developed for handling of drums or containers involving RADIOACTIVE or SHOCK SENSITIVE materials, and LAB PACKS;
  • Lab packs must be opened and inner packages characterized only by personnel familiar with lab pack hazards, inspection, and classification. CRYSTALLIZED materials on inner packages in lab packs shall be handled as SHOCK SENSITIVE until characterized otherwise;
  • Specific equipment to be used for sampling drums shall be noted in the work plan;
  • Staging and containment areas

  • Pathways are depicted on the site safety map;
  • When drums are moved from their original locations to a work area or staging area, a spill containment area must be constructed for those locations. The containment should be able to contain the maximum loss from any of the containers in the area.
  • Safe access and egress points must be provided to all staging areas. Adequate room and ramps must be provided for heavy equipment used to handle drums (e.g., bobcats with drum grapplers). A secondary emergency egress point must also be made available.

Skimming, Pumping, HPU and Generator Use

General skimming operations safety considerations (includes support equipment)

Be mindful of the following factors during skimming operations:

  • Always wear hearing, eye and head protection when operating pumps and hydraulic power units.
  • Do not inspect or clean the hydraulic pump or hydraulic tool while the hydraulic power source is engaged. Disconnect hydraulic hoses before attempting to clean or inspect the pump or hydraulic tool. Accidental engagement of the power unit can cause serious injury.
  • Only lift the power unit by the lifting bracket, and be sure the lifting equipment is suitable for the rated weight of the power unit. Do not lift with hydraulic hoses attached.
  • Do not touch the engine, exhaust piping, or muffler – these surfaces are hot and will burn you. Keep any flammable material away from these surfaces.
  • Do not operate near flammable liquids, vapors or gases.
  • Do not exceed maximum pressure or flow rates identified on the pump data plate.

Lightering Operations

No lightering operation can commence without a risk assessment being completed by the transfer master. Upon completion and authorization to proceed by the IC the transfer master will brief his crew regarding the operating procedures and assignments. At minimum, the briefing will cover the following elements:

  • Mooring, fender placement, lashing and attachment points to make fast between the vessels.
  • Product type and quantity.
  • Individual crew assignments and stations of responsibility.
  • Readiness and operation of fire fighting systems.
  • Proper equipment operating procedures and limits.
  • Proper operability of vents, purge pipes, pressure vacuum breakers and relief systems.
  • Location of washdown hoses and eye wash stations in the event of personnel contamination.
  • Emergency evacuation and muster locations.
  • Static grounding and vapor venting.
  • Sloshing and load shift monitoring.
  • "Stop Work" procedures.

Fueling (all equipment)

Vehicle and equipment fueling procedures and practices are designed to minimize pollution of surface or ground waters. Understanding the procedures for delivering fuel into vehicles, tanks, vessels and response equipment is critical for this purpose. Safety is always the priority.

Prior to any fueling operation:

  • Shut the engine off.
  • Ensure that the fuel is the proper type of fuel.
  • Ensure equipment and temporary storage containers are properly grounded and all ignition sources are extinquished or eliminated.
  • Have fuel compatable fire fighting equipment standing by during the fueling operation.
  • Ensure pumps, transfer and communication equipment is instrisically safe.
  • Do not "top off" tanks.
  • Do not leave pump or fuel hose unattended during refuelling.
  • Whenever practical, vehicles and equipment should be transported to a designated fueling area or facility.
  • Temporary tanks and storage must be properly secured before transport.
  • Never transport fuel containers inside a passenger cabin (vehicles and vessels).
  • Ensure there is adequate ventilation during fueling operations.
  • Vehicles transporting fuel for fueling operations must display the proper placards.
  • Avoid direct skin or eye contact. Proper PPE must be worn during any phase of fuel tranport or transfer operations.
  • Preplan your evacuation route prior to fueling commencement.

Shoreline Flushing, Cleanup and SCAT

In addition to support equipment operation concerns (see Skimming, Pumping, HPU and Generator Use), shoreline assessment and flushing operations require crews to operate detached from the main response activities. Ensure shore teams have communication capability in the event of accident or injury so medical or evacuation services are available.

Wildlife safety protocols must be observed during shore operations (see Wildlife Hazard Considerations).

Lift Truck/ForkLift Operations

Operators must be qualified

  • Operating forklifts should only be done by individuals who have been trained properly and are certificated to operate the equipment.

PPE

  • Operators should wear the appropriate safety work wear; including a hard hat, safety shoes and hi-visibility jackets.
  • The work wear must be reasonably fitted as any loose clothing can get caught on machinery.
  • Don’t operate/hold any of the controls when your hands/work gloves have grease or oily residue on them; it may cause them to slide off and cause an accident.

Examine Equipment before use

  • Operators should do a routine check of the equipment before operating. Check for any faults in brakes, steering, controls, warning devices, mast and tires.
  • If there are any noted damages or problems notify your supervisor and have the unit repair before use.
  • Always consider the ´journey´s end´ of a load before picking it up. A convenient position of a load from pick up may not be convenient for stacking.
  • Ensure all the equipment´s controls are in reach and the seat position and mirrors are adjusted to the operator´s needs before starting.
  • Do not start the forklift until you are correctly seated with their safety belt fastened and all body parts safely inside the confines of the operator´s cabin or the forklift.

Consider the surrounding environment

  • While operating a forklift pay attention and follow any work site rules and guidelines.
  • Operations are restricted to the container area and floating dock area for spill response support.
  • Be aware of the height of the load, mast and overhead guard of the forklift when entering or exiting the waste connex.
  • Be careful when operating on or near a ramp, side of a dock, or the transition points. Enter and exit the ramp aligned parallel to the guard rails.

Operate at a safe speed

  • Operational speed shall not exceed 5 mph.
  • Take corners and any turns slowly to minimize risk of tipping.
  • Make any changes in direction or any stops gradually and slowly.

Avoid Hazards

  • Steer clear of any bumps or uneven ground surfaces along with slippery conditions.
  • Steer clear of loose ground objects which could cause loss of control over the equipment or a load shift.
  • Use the horn prior to backing up or when ascending the ramp with a load obstructing your vision.
  • Keep a safe distance from other equipment in case they move in an unpredictable manner.
  • Make sure that you always have enough space to stop safely.

Ensure your load is stable and secure

  • Check the loads carefully before moving them for stability and damage.
  • Ensure that the load is tilted back with the forks sitting low while transporting.
  • Check for any overhead objects before lifting or stacking loads.
  • Do not lift or move loads that are not safe or stable.
  • Make sure loads are correctly stacked and positioned across both forks.
  • Use securing measures such as ropes or bindings if required.
  • Floating dock access is restricted to periods of high tide only.

Driving on Ramps

  • When driving up the ramp, move in a forward direction and down the ramp in reverse, especially while carrying loads.
  • Do not load or unload goods or turn while on the ramp.

Make sure you have clear visibility

  • Operate the forklift in reverse when it improves visibility; except when moving up ramps.
  • Use a spotter, guide or lookout helper to assist you.

Carry Loads only

  • Only the operator is allowed on the equipment.
  • If a person has to be lifted, use only a securely attached work platform and cage and follow the appropriate operating instructions.

Keep Clear of the Mast

  • Do not authorize anyone to stand or walk under the load or forklift.
  • Keep hands and feet clear of the cross members of the mast. Be aware of pinch and crush points.

Ensure the forklift is not Over-loaded

  • Do not use the tip of the forks as a lever to raise a heavy load.
  • Do not push a load with the tip of the forks.
  • Note the capacity of your forklift and any attachments being used and never exceed this capacity.
  • An overload can cause the rear tires to be raised off the ground and may cause the forklift to tip over.

Ensure the Load is evenly distributed

  • Do not lift or move a load unless both forks are fully under the load.
  • Do not lift a load with one fork. Use pallets and skids that can withstand the weight of the load.
  • Do not use damaged, deformed or decayed pallets for holding loads.

Refueling

  • Change out fuel tanks outside the connex and away from any hazardous materials. Ensure the area is well ventilated and check for leaks prior to starting.

When not in use

  • After use ensure the forklift is parked in a designated or authorized area.
  • Fully lower the forks to the ground or floor and apply the park brake.
  • Turn the forklift "off" and remove the key.
  • The fuel cylinder valve should be turned off (closed) when the forklift is not in use.
  • Do not leave a forklift running while unattended.

Air Operations

Basic Safe Work Practices for all Passengers/Ground Crews:

  1. Passengers should receive a safety briefing from helicopter operators including safety features and equipment, their location on the individual aircraft, water landing procedures when appropriate, and emergency information cards before taking off.
  2. Passengers or ground crewmembers approaching helicopters shall stay in a crouched position, and shall be in clear view of the pilot while approaching or departing a helicopter.
  3. Passengers and ground crew should approach/depart from the FRONT of the helicopter ONLY when signaled by the pilot; and should NEVER walk under or around the tail.
  4. Loose fitting clothing, hats, hard hats, or other gear which might be caught in rotor downwash must be secured or removed within 100 feet of operating helicopters.
  5. Passengers shall maintain a distance of 50 feet from helicopters while rotors are turning. Ground crew should also maintain this distance unless specific work practices are developed for closer work.
  6. Passengers shall wear seat belts at all times.
  7. Passengers and ground crew shall wear hearing protection (including communications headsets, or helmets) at all times around operating helicopters.
  8. Passengers shall generally assist the pilot in watching for other traffic or ground obstacles as directed by the pilot.
  9. During emergency landings in water:
    1. Do not exit until rotor blades stop turning or pilot signals all clear.
    2. Do not inflate life preservers until outside of the helicopter.

Safe Work Practices for Cargo Handling are Ffound in 29 CFR 1910.183 and Include:

  1. Use proper slings and tag lines in accordance with 29 CFR 1910.183(c) and 1910.184.
  2. Testing and use of cargo hooks and electrically operated cargo hooks shall be performed in accordance with 29 CFR 1910.183(d) and (I).
  3. Static charge on suspended loads shall be dissipated with a grounding device before ground crew touch the suspended load unless protective rubber gloves are being worn.
  4. External loads shall not be lifted unless determined to be within the helicopter manufacturer's recommended rating.
  5. Communications shall be maintained in accordance with 29 CFR 1910.183.
  6. Ground and flight crewmembers shall be familiar with, and use the manual signaling system described in 29 CFR 1910.183.

Unmanned Aerial Vehicle (drone) Operations

Operator

  • Only licensed operators using licensed/registered equipment may perform aerial observations operations.
  • All site and FAA rules/regulations must be followed at all times
  • Perform a pre-flight craft inspection.
  • Ensure Fail-safe equipment is functioning properly.
    • RTH (return to home).
    • Recovery chute.
    • Firmware APD (Airport Proximity Detection) Functioning.
  • Perform range test.
  • Perform a launch area walk-around and ensure launch area is free of FOD (foreign object debris) and other possible projectiles.
  • Make sure all actions and contingencies for the mission are planned.
  • Contingency planning should include safe routes in the event of a system failure, degraded performance, or lost communication link.
  • Mission plans and flight plans should be shared with other operators in the vicinity.
  • Perform a pre-flight run up.
  • Communicate to observers by announcing "CLEAR" prior to take-off.
  • Use of a spotter is required at all times
  • Announce out loud “Preparing to Land”, when returning to base.

Observers

  • Observers, other than the designated spotter must maintain a fifteen foot (15´) buffer around the launch and landing site.
  • Eye protection must be worn around UAV operations by all personnel.
  • Hearing protection is optional for measured noise levels below 85db.

Motor Vehicle Safety

One of the most dangerous operations performed by pollution response personnel is driving to and from the spill site. This is particularly true when driving vehicles that you are unfamiliar with such as motor pool and rental vehicles.

Familiarize yourself with your vehicle before driving. Walk around and check the outside condition, familiarize yourself with the interior as well, and make all adjustments before driving a vehicle.

Signs of accident damage:

  • Tires inflated
  • Gas cap is in place and sufficiently tight
  • Front hood and trunk are closed securely
  • Spare tire is in good condition
  • Locate tire-changing equipment
  • Locate road emergency kit
  • Check that exterior lights function properly
  • Headlights (dim)
  • Headlights (bright)
  • Parking lights
  • Emergency flashers (front and rear)
  • Left turn indicator (front and rear)
  • Right turn indicator (front and rear)
  • Brake lights
  • Side mirrors adjusted and in good condition
  • Adjust the rear view mirror
  • Horn works properly
  • Seat belts are in good condition
  • Locate your sunglasses
  • Locate the headlight switch
  • Locate the headlight dimmer switch
  • Locate the windshield wiper switch
  • Locate the windshield washer switch
  • Locate panel light brightness adjustment
  • Locate heating and air conditioning switches
  • Locate radio/audio control switches
  • With ignition switch on (before ignition) check
  • Oil light/gauge
  • Battery charging failure light/gauge
  • Engine overheating light/gauge

GET YOUR ATTITUDE RIGHT before driving!

  • Pollution response personnel must function with "DELIBERATE speed" - not reckless speed.
  • Forget schedules while driving! The road is no place to make up lost time.
  • SETTLE DOWN! Do not bring frustrations into the vehicle with you.
  • Make up your mind to be the most courteous driver on the road. Forget about getting even with bad drivers on the road. Forget about competing with other drivers.
  • Expect other drivers to make stupid mistakes, and prepare to deal with their mistakes.
  • Having the right-of-way is no substitute for being alive. Expect the other drivers to break the rules.
  • Use your parking lights ONLY WHEN PARKED! Use your headlights during all conditions of reduced visibility (dawn, dusk, fog).
  • Do not drive under the influence of alcohol or drugs. Coffee, cold showers, fresh air, or other "remedies" will not make you sober. Only time will make you sober.
  • COFFEE IS ALSO A DRUG and may actually cause hallucinations!
  • Take frequent breaks about every hour or 100 miles. If you decide to take a nap, pull over at a well-lighted rest stop and keep your doors locked while you are sleeping.
  • Conditions that increase the likelihood of highway hypnosis include:
    1. Driving too long without a break
    2. Driving at night
    3. Staring straight ahead instead of scanning all directions
  • Look ahead for problems and maintain a safe distance behind the car in front of you.
  • Slow and steady is the best pace for driving on snow, ice, or other slippery road surfaces. Do not hit your brakes hard or accelerate quickly.
  • Do not stare into the headlights of oncoming traffic.

Confined Space Entry

Pre-entry Operations

Before anyone enters the permit space, take precautions to prevent the entrance of inert gases, flammable or hazardous materials by blanking or valving off, in conjunction with a lockout system. Test the air within the space for oxygen deficiency, flammable gases or vapors, toxic materials or engulfing solids. If you identify a hazardous condition, take steps to eliminate or alleviate the condition, such as purging the space with steam, water, air or an inert gas. The use of steam can, and the use of inerting gas certainly will, cause oxygen deficiency. So if you use these, good air ventilation should follow. Lock out and tag all energy sources — electrical, pneumatic, hydraulic, steam and gravity. In addition, block moving equipment.

Permit Requirements

Prior to any confined space entry a permit request must be completed and approved. The permit must contain the following information

  • Identity of the permit space;
  • Purpose of entry;
  • Date of entry and the authorized duration;
  • Authorized entrants;
  • Eligible attendants;
  • Individuals eligible to be in charge of the entry process;
  • Signature of the person authorizing entry;
  • Hazards of the permit space;
  • Measures for isolation of the permit space;
  • Measures such as lockout/tagout, purging or inerting, that are used to remove or control hazards;
  • Acceptable environmental conditions, quantified with regard to the hazards identified in the permit space;
  • Testing and monitoring equipment and procedures used to verify all acceptable environmental conditions are maintained;
  • Rescue and other services that would be summoned;
  • Communication procedures and equipment to be used;
  • Personal protective equipment required.

NOTE: If hot work is required as part of the work to be done, use a separate hot-work permit.

NOTE: Oxygen content must be between 19.5% and 21.4%.

Entry Operations

Station a trained attendant immediately outside the space. Ventilation fans, or blowers and hoses, may be necessary to keep the atmosphere inside the space within safe limits. You should conduct confined-space atmospheric testing and record the results. To perform the needed tasks, non-sparking, pneumatic and/or low voltage electrical equipment may be necessary. To increase safety, compressed gas cylinders, except for self-contained breathing apparatus cylinders, must remain outside the space. Those enter-ing the space should use a full-body harness with a lifeline attached and have a communication system in place. Personal protective equipment, such as coveralls, chemical protective clothing, safety eyewear, hear-ing protection, hard hat, gloves, boots, respiratory equipment and leathers, if welding, might be necessary.Working in permit-required confined spaces is a difficult assignment, with dozens of potential hazards. It takes time to prepare the space, to negate the hazards, maybe as much time as it takes to perform the job. However, if climbing safely out of the space is one of the expected outcomes, following OSHA’s guidelines is just part of the job.

A fillable .pdf Confined Space Entry Permit can be downloaded here.

Working at Heights

When working at heights is required use the following safety protocols:

  • Do as much work as possible from the ground;
  • minimise the distance and consequences of a fall, by using the right type of equipment where the risk cannot be eliminated;
  • Ensure workers can get safely to and from where they work at height;
  • Ensure equipment is suitable, stable and strong enough for the job, maintained and checked regularly;
  • Take precautions when working on or near fragile surfaces;
  • Provide protection from falling objects;
  • Document emergency evacuation and rescue procedures;
  • Don’t overload ladders – consider the equipment or materials being carrying before working at height.;
  • Check the pictogram or label on the ladder for information and limitations;
  • Don't overreach on ladders or stepladders;
  • Don't rest a ladder against weak or unstable upper surfaces;
  • Don't use ladders or stepladders for strenuous or heavy tasks, only use them for light work of short duration (a maximum of 30 minutes at a time);
  • Don't let anyone who is not competent (who doesn’t have the skills, knowledge and experience to do the job) work at height;
  • Fall protection (guardrails or fall arresting harness) must be used for work higher than four (4) feet;

Wildlife Hazard Considerations

Handling Wildlife

Never handle birds unless trained in handling procedures. The following references provide specific details on capturing and handling procedures.

  • Rehabilitating Oiled Sea Birds--A Field Manual. International Bird Rescue Research Center, 699 Potter St., Berkeley, CA 94710.
  • Oiled Bird Rehabilitation--A Guide for Establishing and Operating a Treatment Facility for Oiled Birds. Tri-State Bird Rescue & Research, Inc., 110 Possum Hollow Rd.; Newark, Delaware 19711

The following are generals safety guidelines for handling.

  • Never hold birds or marine mammals near your face. Keep them down at the waist level of the shortest partner.
  • Always work with a partner when handling wildlife. THE BUDDY SYSTEM IS A MANDATORY SAFE WORK PRACTICE BY REGULATION.
  • For prolonged handling (such as during washing):
    • A beak gag may be used to minimize biting and choking. When using gags it is important to ensure that a breathing gap is provided with a dowl rod or similar device. Not all birds have adequate nares openings for breathing (or openings may be blocked by contaminants).
    • A coordinated effort with one partner controlling he birds head and/or body will often be adequate for many species.
  • Oiled or injured wildlife capture or handling may only be attempted by trained personnel holding a current certification.

Bear Protection

When workers are required to work on shore a bear watch will be established. Bear watch will be armed with shotguns. Only U.S. Coast Guard or Fish and Wildlife personnel qualified in weapons use, or other qualified individuals approved specifically by the Safety and Health Officer will be allowed to carry weapons.

All shoreside workers will be equipped with bear mace (pepper spray) and a hand held persona emergency safety horn

Safety Tips

  • Do not surprise bears – make noise
  • Be especially alert when traveling into wind
  • Stay away from dead animals and berry patches
  • Watch for bear signs
  • Never approach a bear
  • Put food and garbage away. Use bear-proof containers or hang > 12’ above ground
  • Do not cook near tents
  • Report any bear sighting to the command post
  • Do not run from a bear
  • Do not throw anything at bears
  • Do not threaten bears

Initial Air Monitoring Log

Instrument ID Person Monitoring
Date/Time Location
Results Concerns

For ongoing measurements, record results using Form ICS-208 (SSP-E-1) Air Monitoring Log

Air Monitoring Plan

Air Monitoring Locations

Air monitoring will be conducted in the downwind area of operations. Monitoring will be conducted using the devices and locations listed in the table below:

Instrument Type Location

Real-time air monitoring will be performed and recorded appropriately. The air monitoring at each specified location will be established to monitor real-time for the hazards identified in the HAZARDS section above.

Personal Protective Equipment - General (Modified Level - D unless directly specified by section)

  • Coveralls or rain gear
    • Long or short sleeves (weather dependant).
    • Tyvek
    • Street/work cloth may be worn by personnel not exposed to splashing liquids or oily equipment.
  • Resistant steel toe/shank safety boots/shoes with textured bottoms/soles.
    • Option: hip high boots for shore cleaning.
    • Option: deck shoes with textured soles for boat or dock work.
  • Resistant gloves
    • Inner gloves
    • Textured palm and finger surface
    • Option: leather gloves (if no oil contact)
  • Hard hat
    • Overhead work
    • Slippery or uneven surfaces
  • Eye protection
    • Safety glasses
    • Face shield
  • PFD
    • Type V
    • Option: Inflatable
  • High visibility vest or reflective bands for low light conditions
  • Hearing protection (where noise above 80db)
  • Insect Repellent
  • Quart bottle to carry fluids (during heat stress alerts)
  • Sunscreen
  • Emergency whistle
  • Emergency Strobe (on water operations)

Respiratory protection may be used in this ensemble as a safe work practice while working around carcinogens in order to keep low exposures as low as reasonably attainable. For spill response involving oils that may still contain benzene in particular this may be used while working in close proximity to spilled product until benzene has weathered away (typically the first day).

No changes to the specified levels of protection shall be made without the approval of the Site Safety Officer and the Operations Section Chief.

Work or Survival Suit Recommended

Combined water and air temperature are below the established guidelines and use of a work or survival suit while working on the water is recommended.

Safe Work Practices for Small Boats

  1. Ensure that all boats comply with the appropriate state and federal regulations. In addition to the items discussed below certain types of vessels will require such items as USCG approved fire extinguishers, backfire flame control, powered ventilation, sound signaling devices (different from emergency signals), navigation lights/ signals, pollution placards, and marine sanitation devices.
  2. Boat operators should familiarize themselves, and passengers with safety features and equipment on their boats.
  3. Boats should be operated by qualified individuals.
  4. Life jackets, work vests, mustang suits, or other appropriate Coast Guard approved Personal Flotation Devices (PFDs) should be worn by personnel in small boats.
    1. Use of mustang suits are particularly critical under conditions of cold stress.
    2. Types of Personal Flotation Devices (PFDs):
    3. PFD Classifications:

      • TYPE I. Off-shore life jacket provides the most buoyancy. Effective for all waters and intended specifically for open, rough, or remote waters where rescue may be delayed.
      • TYPE II. Near-shore buoyancy vests are intended for calm, inland water or where there is a good chance of quick rescue.
      • TYPE III. Flotation aids are good for calm, inland water, or where there is a good chance of quick rescue. Examples: float coats, fishing vests, and ski vests.
      • TYPE IV. These are throwable devices, not intended to be worn or to replace those that are worn.
      • TYPE V — SPECIAL USE. These are intended for specific activities (according to the conditions on the labels). Some examples: deck suits, mustang suits, work vests, and hybrid PFDs below.
      • TYPE V — HYBRID INFLATABLES. These PFDs contain a small amount of inherent buoyancy and an inflatable chamber. Performance equals that of a Type I, II, or III PFD (as noted on the label) WHEN INFLATED.
  5. Small boats should generally not be operated for oil recovery after sunset. If this is required or poses minimal risk, routes of operations should be carefully prescribed, individual boats should maintain a communication schedule with a shore base; and should be fully equipped with appropriate running lights, emergency signals, and personnel onboard should be wearing emergency night signaling devices
  6. Distress signals (three or more for day and three or more for night) should be carried onboard all vessels. These devices may be required by regulation. They may be stored onboard or issued to individuals. If stored onboard they should be in a sealed, watertight, orange container marked "DISTRESS SIGNALS".
    1. USCG approved pyrotechnic visual distress signals include red flares (hand-held or aerial), orange smoke (hand-held or floating), and launchers (for aerial red meteors or parachute flares). PYROTECHNIC DEVICES SHOULD NOT BE USED NEAR FLAMMABLE PRODUCT SPILLS.
    2. Non-pyrotechnic distress signals are not approved individually but need to meet certain requirements. They should be in serviceable condition, readily accessible, and certified by the manufacturer as complying with USCG requirements. These devices include orange distress flags, and electric distress lights.
    3. Distress flags are day signals only. They must be at least 3 x 3 feet with a black square and ball on an orange background.
      1. Electric distress lights are for night use only. These devices automatically flash the international SOS code (...– – – ...) so a flashlight IS NOT considered a distress signal. Under inland navigation rules a high intensity strobe light is considered a distress signal.
      2. It is a violation of regulations to display visual distress signals on the water except when assistance is required.
  7. Boat operators must keep their supervisors informed of their area of operations, especially when they change their work area (if plans call for a boat to move to another location during a shift, the operator should advise their supervisor of their actual time of departure).
  8. Boat operators should never anchor their boats by the stern. This is typically the lowest point on the boat due to design and/or loading, and is often squared off making it vulnerable to swamping.
  9. Transferring people from one vessel to another should be kept to an absolute minimum, and must have concurrance of the person being transferred prior to the transfer.
  10. Portable fuel tanks should be filled outside of the boat. All sources of ignition in the area of fueling (e.g., engines, stoves or heat producing equipment, and electrical equipment) should be secured while fueling.
  11. Strict adherence to the buddy system must be observed in small boats; and all boats should be in direct visual or radio contact with a shore base at all times.
  12. To avoid slipping on wet decks or falling in small boats, personnel should remain seated while boat is underway. Horseplay and speeding must be strictly prohibited. Personnel should keep their center of gravity as low as possible while working in small boats.
  13. Boat operators must also ensure that boats are not overloaded. The capacity should be marked on a label on the boat. If it is not a general rule of thumb is:
  14. LENGTH x WIDTH / 15 = PEOPLE (150 lbs)

    Since equipment adds to the weight it should be considered as well. Weight should be distributed evenly.

  15. Personnel working in or operating small boats should be equipped with appropriate shoes/boots designed to help maintain traction on wet surfaces.
  16. Safety sunglasses, and hearing protection should be worn by personnel working in or operating small boats where appropriate.
  17. Fixed ladders or other substantial access/egress should be provided at boat transfer locations exceeding several feet.
  18. Depending on the specific nature of the operations (e.g., work in remote areas), other emergency equipment which should be considered such as: anchors, radios, bailers, first aid kits, and additional means of propulsion (e.g., paddles).
  19. Workers should be cautioned about using their legs as fenders, or getting their hands, arms, or legs between vessels or between vessels and docks or fixed structures.

Crane Operations/Overhead Work

Overhead work requires you to be absolutely focused on the task at hand. Cranes and davits may be used as part of a normal operation and while equipment specifics vary, one thing remains the same, before any operation it is your responsibility to be familiar with the equipment you will be using, to ensure the safety checks have been performed prior to use and to ensure everyone is on the same page.

  1. Prior to commencement of any work perform the safety inspection to ensure your equipment is in acceptable working order.
    1. Check for loose or missing parts.
    2. Operate each control button and ensure all the buttons are labeled.
    3. Check upper hoist limit switch.
    4. Lower the hoist block to activate the lower limit switch.
    5. Make sure the wire rope is properly seated and check for reduced diameter, broken strands, kinks, crush points, cuts or bird cage or rats nest tangles.
    6. Operate the lifting capability without a load several feet in each direction of travel.
    7. Check all hooks, pins, sheaves, shackles, guards and assemblies.
  2. Situational Awareness
    1. Overhead work requires your full attention.
    2. Do not engage in any activity that will divert your attention.
    3. Do not lift, lower, or transport a load with the crane or hoist until all personnel are clear of the load and the load’s path. Loads should never be suspended over personnel below.
    4. Verify that the load, crane and hoist will clear all obstacles before moving or rotating the load.
    5. Verbally warn people before starting load travel motion.
    6. Slings, load chains and other lifting devices must be fully and securely seated in the hook before moving a load. Remove slack from the sling, chain, or cable before lifting a load.
    7. Whenever possible, maintain a minimum clearance of one foot above loads and to the sides. Raise the load only to the height necessary to clear lower objects.
    8. Never leave the controls unattended while a load is suspended. If it becomes necessary to leave the controls, lower the load to the deck.
    9. Disconnect power to a hoist that is unsafe or in need of repair. Arrange to have the disconnect switch locked and the control panel tagged with an “Out of Order” or “Do Not Operate” tag. Never operate a hoist that has been tagged with an “Out of Order” or “Do Not Operate” tag, or is your opinion, UNSAFE TO OPERATE…
  3. Non Verbal Communications
    1. Go over your hand signals. Ensure everyone knows what to expect.
    2. A signal person is required when:
      1. The point of operation is not in full view of the operator or the operator's view is obstructed in the direction of the load travel.
      2. Either the operator or the handler determines if a signal person is needed.
      3. Use only one signaller and post an observer.
      4. The right hand signals are the ones you understand and use.
  4. Slinging
    1. Slings play an important role of a successful pick. They must be inspected prior to any use. No damage must be visible or the sling should be rejected.
    2. It's up to you to ensure that slings are hitched in a manner providing control of the load, look for sharp edges that may contact the slings, wrap any sharp edges with padded material of sufficient strength to protect the sling.
    3. Ensure that slings are shortened or adjusted only by methods approved by the sling manufacturer or a qualified person
    4. When using a basket hitch, make sure the load is balanced to prevent slippage and ensure that the legs of the sling contain or support the load from the sides, above the center of gravity, so that the load remains under control.
    5. Do not drag slings on the floor or over abrasive surfaces, When using a choker hitch, ensure the choke point is only on the sling body, never on a splice or fitting.
    6. Ensure that, in a choker hitch, an angle of choke less than 120 degrees is not used without reducing the rated load.
    7. Ensure that slings are not constricted, bunched, or pinched by the load, hook, or any fitting.
    8. Center your load in the base (bowl) of the hook to prevent point loading on the hook, unless the hook is designed for point loading
    9. Ensure that an object in the eye of a sling is not wider than one-third the length of the eye.
    10. Never shorten a sling by knotting or twisting.
    11. Do not rest the load on the sling and not pull a sling from under a load if the load accidentally rests on the sling
    12. Do not allow shock loading, and avoid twisting and kinking.
  5. Tag lines
    1. Tag lines should be used to aid in controlling your load and should be attached to the load swing end.
    2. The line should never be wrapped around your hands or body, stay out of the bight of the line and be conscious of entanglement situations.
    3. For long lines, use a line tender to avoid trip hazards.
  6. Other considerations
    1. Do not lift, lower, or transport personnel by means of the crane, hoist hook, or load.
    2. Slowly inch the hook into engagement with the load to eliminate wire rope slack and reduce impact loading of the crane and hoist.
    3. Avoid quick reversals of direction and rapid movements in any direction.
    4. Keep the hoisting lines vertical.
    5. Do not pull or push your load and never pull a hoist by the pendant cable.
    6. Always maintain two full wraps of cable on the hoisting drum.
    7. When lifting loads at or near capacity, raise the load a few inches off the floor and test the hoist brakes by returning the master switch or push button to the “OFF” position.

Hand Signals

Common hand signals

Communication Procedures

Channel 10 has been designated as the working radio frequency for personnel in the Exclusion Zone. All other onsite radio communication will use Tach 1.

Personnel in the Exclusion Zone should remain in contstant radio communication or within sight of the Team Lead. Any failure of radio communications requires an evaluation of whether personnel should leave the Exclusion Zone.

Three (3) short blast from an air horn is the emergency signal to evacuate the Exclusion Zone. Muster points have been established at the following locations:

Evacuation and Muster Locations

Emergency hailing will use Channel 16.

Telephone communications to the Command Center should be established as soon as possible.

The following standard hand signals will be used in the case of radio failure.

Signal Meaning
Hand gripping throat Out of air, can't breath.
Grip partner's wrist or hands around waist Leave area immediately.
Hands on top of head Need assistance.
Thumbs up Okay, I'm alright, I understand.
Thumb down NO, negative.

First Aid and Emergency Medical Services

All vessels are equiped with First Aid Kits. Ask your supervisor for the location of the nearest kit in your general work vicinity. Additionally, OSRV's are equiped with an AED and eyewash stations. An additional AED can be accessed in the OSRO TO-GO kit.

An emergence evacuation/extraction point is identified on the site map.

Emergency Response Plan

Capsized/Abandoning Vessel

Fire

Man overboard

Decontamination Procedures

Personnel and equipment leaving the Exclusion Zone shall be thoroughly decontaminated. The standard level D decontamination protocol will be used. Decontamination involves the removal of oil or other contaminants from personnel or equipment after they leave the Hot Zone. The purposes of decontamination are to:

Decontamination is conducted in the Warm Zone, which is the control point for personnel entering and leaving the Hot Zone. Decontamination is divided into four categories based on the level of personal protection equipment (PPE) being used for the spill zone. In general, personnel and equipment move through various steps of decontamination to ensure that gross contamination is removed first, and that uncontaminated clothing/equipment do not become contaminated by the decontamination process.

Medical Plan

Local Services Information - Zone 1

Ketchikan - Metlakatla Area

Medical Aid Stations

Station Location Contact # EMS/EMT
OSRV Work site Marine Ch. 16 No
Marine Ch. 16 No
Marine Ch. 16 No

Transportation

Service Provider Contact # EMS/EMT
City of Ketchikan/Ambulance 911 or (907) 225-3111 Yes
Ketchikan Gateway Boro/Ambulance 911 or (907) 247-5521 Yes
Medevac Alaska (877) 985-5022 Yes
Temsco Helicopter (907) 225-5141 No
No
No

Hospitals

Service Provider Address Contact # EMS/EMT Burn Center Helipad
Peace Health Medical Center 3100 Tongass Ave. (907) 225-5171 Yes No Yes
Harbor View Medical Center 325 9th Ave. Seattle, Wa. (206) 744-3000 Yes No Yes
Nortwest Hospital 1550 N. 115 St. Seattle, Wa. (877) 694-4677 Yes No Yes
No No No

Local Services Information - Zone 2

Craig - Klawock - POW Area

Medical Aid Stations

Station Location Contact # EMS/EMT
OSRV Work site Marine Ch. 16 No
Marine Ch. 16 No
Marine Ch. 16 No

Transportation

Service Provider Contact # EMS/EMT
City of Craig/Ambulance 911 or (907) 826-3257 Yes
Apollo MT/Ambulance - Klawock 911 or (907) 455-0292 Yes
City of Klawock/Ambulance 911 or (907) 755-2222 Yes
City of Thorne Bay/Ambulance 911 or (907) 828-3380 Yes
Medevac Alaska (877) 985-5022 Yes
Temsco Helicopter (907) 225-5141 No
No
No

Hospitals

Service Provider Address Contact # EMS/EMT Burn Center Helipad
Peace Health Medical Center 3100 Tongass Ave. (907) 225-5171 Yes No Yes
Metlakatla WIC Clinic 92 Upper Milton St. (907) 886-5872 Yes No Yes
Harbor View Medical Center 325 9th Ave. Seattle, Wa. (206) 744-3000 Yes No Yes
Nortwest Hospital 1550 N. 115 St. Seattle, Wa. (877) 694-4677 Yes No Yes
No No No

Local Services Information - Zone 3

Petersburg - Wrangell Area

Medical Aid Stations

Station Location Contact # EMS/EMT
OSRV Work site Marine Ch. 16 No
Marine Ch. 16 No
Marine Ch. 16 No

Transportation

Service Provider Contact # EMS/EMT
City-Boro Wrangell/Ambulance 911 or (907) 874-3223 Yes
Petersburg Boro/Ambulance 911 or (907) 772-3355 Yes
Medevac Alaska (877) 985-5022 Yes
Temsco Helicopter - Wrangell (907) 874-2010 No
Temsco Helicopter - Petersburg (907) 772-4780 No
No
No

Hospitals

Service Provider Address Contact # EMS/EMT Burn Center Helipad
Wrangell Medical Center 310 Bennett St. (907) 874-7000 Yes No No
Petersburg Medical Center 103 Fram St. (907) 772-4291 Yes No No
Harbor View Medical Center 325 9th Ave. Seattle, Wa. (206) 744-3000 Yes Yes Yes
Nortwest Hospital 1550 N. 115 St. Seattle, Wa. (877) 694-4677 Yes No Yes
No No No

Local Services Information - Zone 4

Kake - North Kupreanof Area

Medical Aid Stations

Station Location Contact # EMS/EMT
OSRV Work site Marine Ch. 16 No
Marine Ch. 16 No
Marine Ch. 16 No

Transportation

Service Provider Contact # EMS/EMT
Ambulance - No Service No Service No
Medevac Alaska (877) 985-5022 Yes
Temsco Helicopter (Petersburg) (907) 772-4780 No
No
No

Hospitals

Service Provider Address Contact # EMS/EMT Burn Center Helipad
Kake Health Center 105 Totem Way (907) 785-3333 Yes No No
Harbor View Medical Center 325 9th Ave. Seattle, Wa. (206) 744-3000 Yes Yes Yes
Nortwest Hospital 1550 N. 115 St. Seattle, Wa. (877) 694-4677 Yes No Yes
No No No

Local Services Information - Zone 5

Sitka - Tenakee Springs - Angoon Area

Medical Aid Stations

Station Location Contact # EMS/EMT
OSRV Work site Marine Ch. 16 No
Marine Ch. 16 No
Marine Ch. 16 No

Transportation

Service Provider Contact # EMS/EMT
City and Boro of Sitka/Ambulance 911 or (907) 747-3233 Yes
Medevac Alaska (877) 985-5022 Yes
Temsco Helicopter (Juneau) (907) 789-9501 No
No
No

Hospitals

Service Provider Address Contact # EMS/EMT Burn Center Helipad
Sitka Community Hospital 209 Moller Ave. (907) 747-3241 Yes No Yes
Tenakee Springs Health Center D' St. (907) 736-2347 No No No
Jessie Nroma Jim Health Center 725 Relay Rd. (907) 788-4600 No No No
Harbor View Medical Center 325 9th Ave. Seattle, Wa. (206) 744-3000 Yes No Yes
Nortwest Hospital 1550 N. 115 St. Seattle, Wa. (877) 694-4677 Yes No Yes
No No No

Local Services Information - Zone 6

Gustavus - Hoonah - Elfin Cove Area

Medical Aid Stations

Station Location Contact # EMS/EMT
OSRV Work site Marine Ch. 16 No
Marine Ch. 16 No
Marine Ch. 16 No

Transportation

Service Provider Contact # EMS/EMT
City of Gustavus/Ambulance 911 or (907) 697-2451 Yes
City of Hoonah/Ambulance 911 or (907) 945-3663 Yes
Medevac Alaska (877) 985-5022 Yes
Temsco Helicopter (Juneau) (907) 789-9501 No
No
No

Hospitals

Service Provider Address Contact # EMS/EMT Burn Center Helipad
Gustavus Clinic 42 Dolley Varden Rd. (907) 697-5120 Yes No No
Hoonah Health Center Eight Street Extension (907) 285-3462 Yes No No
Harbor View Medical Center 325 9th Ave. Seattle, Wa. (206) 744-3000 Yes Yes Yes
Nortwest Hospital 1550 N. 115 St. Seattle, Wa. (877) 694-4677 Yes No Yes
No No No

Local Services Information - Zone 7

Juneau - Green's Creek - Couer Alaska Area

Medical Aid Stations

Station Location Contact # EMS/EMT
OSRV Work site Marine Ch. 16 No
Marine Ch. 16 No
Marine Ch. 16 No

Transportation

Service Provider Contact # EMS/EMT
City & Boro of Juneau/Ambulance 911 or (907) 745-0268 Yes
Medevac Alaska (877) 985-5022 Yes
Trinity Air Ambulance (954) 771-7911 Yes
LifeMed (800) 478-5433 Yes
Temsco Helicopter (877) 789-9501 No
Coastal Helicopter (907) 789-5610 No
Helicopter over Juneau (855) 445-8965 No
No
No

Hospitals

Service Provider Address Contact # EMS/EMT Burn Center Helipad
Bartlett Regional Hospital 3260 Hospital Dr. (907) 789-8900 Yes No Yes
Harbor View Medical Center 325 9th Ave. Seattle, Wa. (206) 744-3000 Yes Yes Yes
Nortwest Hospital 1550 N. 115 St. Seattle, Wa. (877) 694-4677 Yes No Yes
No No No

Local Services Information - Zone 8

Haines - Skagway Area

Medical Aid Stations

Station Location Contact # EMS/EMT
OSRV Work site Marine Ch. 16 No
Marine Ch. 16 No
Marine Ch. 16 No

Transportation

Service Provider Contact # EMS/EMT
Haines Volunteer Fire Dept./Ambulance 911 or (907) 766-2115 Yes
City of Skagway/Ambulance 911 or (907) 983-2300 Yes
Medevac Alaska (877) 985-5022 Yes
Temsco Helicopter (Juneau) (907) 789-9501 No
No
No

Hospitals

Service Provider Address Contact # EMS/EMT Burn Center Helipad
Haines Health Center 131 1st Ave. (907) 766-6300 Yes No Yes
Dahl Memorial Clinic 350 14th Ave (907) 983-2255 Yes No Yes
Harbor View Medical Center 325 9th Ave. Seattle, Wa. (206) 744-3000 Yes Yes Yes
Nortwest Hospital 1550 N. 115 St. Seattle, Wa. (877) 694-4677 Yes No Yes
No No No

Local Services Information - Zone 9

Yakutat Area

Medical Aid Stations

Station Location Contact # EMS/EMT
OSRV Work site Marine Ch. 16 No
Marine Ch. 16 No
Marine Ch. 16 No

Transportation

Service Provider Contact # EMS/EMT
Yakutat Volunteer Fire Dept./Ambulance 911 or (907) 784-3544 Yes
Medevac Alaska (877) 985-5022 Yes
No
No

Hospitals

Service Provider Address Contact # EMS/EMT Burn Center Helipad
Yakutat Community Health Center 712 Ocean Cape Rd. (907) 784-3275 Yes No Yes
Harbor View Medical Center 325 9th Ave. Seattle, Wa. (206) 744-3000 Yes Yes Yes
Nortwest Hospital 1550 N. 115 St. Seattle, Wa. (877) 694-4677 Yes No Yes
No No No

Tailgate Briefing Topics

General Operations

Lines under tension

Pinch points

Proper lifting

Entanglement/situational awareness

User of guides and spotters

Loose clothing/jewelry

Slips, trips and falls

Machine and tight spaces

Crane and overhead work

Communications/working channel/non verbal

Crushing injuries/anchors

vessel proximity operations

Flotsam and debris (deployment/retrieval/skimming

Hyper/hypothermia

Hydration

PPE and PFD

First aid/AED

Captain's Briefing

Vessel Safety

Vessel safety equipment

Man overboard procedures

Emergency evacutation

Emergency signal